Rabu, 24 Desember 2014

How to Install LESS CSS Compiler on Ubuntu Using Node NPM Install

LESS is an excellent css compiler that makes life a lot easier. However, installing it on ubuntu means jumping through a few hoops in order to get the most up to date version.

It is straight forward however, so here's the steps..


sudo apt-get update
sudo apt
-get install git-core curl build-essential openssl libssl-dev
git clone https
://github.com/joyent/node.git
cd node
./configure 
 
make 
(This will take a while!)
 
sudo make install
node
-v (test it works)

Now Download NPM, which we'll use to install LESS

 
curl https://www.npmjs.com/install.sh | sudo sh
npm
-v
npm install less


echo "PATH=$PATH:$HOME/node/node_modules/less/bin" >> ~/.bashrc 
source
~/.bashrc
 
You should now be able to invoke LESS from the terminal window like so:

lessc LESSFILE.less > CSSFILE.css

Jumat, 11 Oktober 2013

How to Archive and Backup Emails with Postfix and Dovecot Subfolders on Ubuntu Servers

I've been thinking recently that as well as an off-site compressed backup of all of the emails within my system, I would also like a (relatively) easy way to recover an email that one of my users has accidentally deleted from their their trash folder (i.e. it's gone forever).

So how do we archive and backup emails with Dovecot? It's actually quite simple, and if I say so myself.. clever :-)

Step One:

Blind Carbon Copy, always_bcc

Ok, so first off, create a new user for your main domain. I used "archive@domain.com" for simplicity. You then need to configure postfix to always blind carbon copy every email sent and received to that email address...

Copy and paste this line into your terminal command line (substitute your domain in)


sudo -i
cp /etc/postfix/main.cf /etc/postfix/main.cf.bak
sudo echo "always_bcc = archive@domain.com" >> /etc/postfix/main.cf

What are we doing here? Well, first off we are becoming the super user, backing up our main.cf configuration file for safety and then we are echoing into the file /etc/postfix/main.cf the always_bcc variable. Notice the use of TWO pointy brackets, this appends the line to the file, if you use one, you will replace the contents, so make sure you don't do that here :)

Ok, so with that done, if you log into Roundcube or with your email client to check the archive@domain.com account, you will now start receiving every email that goes through your system, in and outgoing.

Step Two:

Adding Dovecot Maildir Subfolders from Command Line

That's a great start, but a year down the line, this is going to be very unorganised. Yes, we could sort by date, but if you have a large system or lots of active users, that isn't going to be particularly realistic. What we want to do is create Dovecot subfolders for each domain.

Now this is where we need to think a little bit. We cannot simply take the email address "to" field and sort by that, because what happens if there is more than one email address? No, we need to use the sender's email address, as there can only ever be one of those.

We will grab the sender's domain and check to see if we have a Dovecot subfolder for that domain. If we do, move the email in to that subfolder, if not, we will first create the folder and then move the email.

Two things for consideration are, we need to not only create the correct subfolder, but we also have to automatically subscribe archive@domain.com to the new folder so that when you check the emails, the new subfolders are automatically added for us.

So, here is the code that will do all this for you, that can be run however often you want (I do it once daily with cron, leaving it any longer could mean it using a lot of resources whilst everything is sorted.


STORE=/var/vmail/vmail1/domain.com/a/r/c/archive-2013.10.11.16.04.29/Maildir/cur
KEEP=/var/vmail/vmail1/domain.com/a/r/c/archive-2013.10.11.16.04.29/Maildir


for x in `find $STORE -type f`
do
echo "--==~~==--"
RSLT=`cat $x | grep "Return-Path"`
PERSONTMP=`echo $RSLT | cut -f 2 -d "<"`
PERSON=`echo $PERSONTMP | cut -f 1 -d ">"`
echo "..get email $PERSON"
NAMETMP=`echo $PERSON | cut -f 2 -d "@"`
NAME=`echo $NAMETMP | tr '.' '_'`
echo "..senders domain is $NAME"
if [ -d $KEEP/.INBOX.$NAME ]
then
echo "..archive subfolder already exists.."
else
echo "..archive folder does not exist .. we will create it.."
mkdir -p $KEEP/.INBOX.$NAME/cur
echo `chown vmail:vmail -R $KEEP/.INBOX.$NAME`
echo `chmod 0700 $KEEP/.INBOX.$NAME`
echo "..adding .INBOX.$NAME to subscriptions"
echo "INBOX.$NAME" >> $KEEP/subscriptions
fi
echo "..Moving email.."
mv -uv $x $KEEP/.INBOX.$NAME/cur
done


Notes:

  • You will need to first check through your vmail directory to find the correct path for your archive email as Maildir uses dates, time and categorisation in the path so yours will be different.
  • Notice that the actual subfolders your emails are stored in is .INBOX.NAME/cur.
  • For the sake of tidyness, we are replacing any periods (.) in the domains with underscores (_) such as gmail.com -> gmail_com This is because the way MailDir folders work, is that rather than directories inside directories, subfolders are denoted by periods. SO with some email addresses, you would end up with two or three subdirectories before you get to the actual emails. For example, twitter's email is twitter@bounce.twitter.com so the folder tree would be bounce/twitter/com/ which is annoying and untidy for navigation through in Email clients, our way, we just have one folder for each domain.

That's it! Now, when someone rings you up worried that they have deleted an important email, all you need to know is the domain it was sent from, and to make your life easier, the approximate date. Log in to your archive email account and find the domain folder.

That's it for another entry, please remember to click an advert if I have helped you :)

Minggu, 15 September 2013

Amavis Mark Email as Spam, Automatically Move Spam to Junk Spam Folder

So I've been doing some experimenting this weekend with the idea of what to do with suspected junk/spam email and whether we should leave it up to the end user to deal with it, or get the server to do something about it. With iRedMail installed, Dovecot, Postfix and Amavis can take care of this for you, to whatever level you wish.

If you want, you could just have suspected email have a special "tag" added to the subject and then your users can use this to create their own rules to do what they want with it. I want to go one step further, I want "tagged" spam mail to automatically get put into the spam folder. This way, users can still check if they want to, but it will keep their main inbox folder clean and tidy.

Ok, so how do we automatically move spam emails to the junk folder? It's a multistep process..

The first thing we need to do is make sure that all of your domains are included in the Amavis list to be checked and tagged (by default, iRedMail will only do this with your initial/main/Fully Qualified Domain Name). So, thanks to the official iRedMail Forum's user "cmjnissen" for this).

Edit the Amavis configuration file (Ubuntu 12.04 location : /etc/amavis/conf.d/50-user)

Find and comment out the line

#@local_domains_maps = ( [".mydomain.com"] );
and add all of the domains that you host

This ensures all of them are checked and tagged for spam. So now we need to make sure that all emails have a tag added to their subject. We need to scroll down (or search with 'CTRL+w') to the line with the variable "$sa_spam_subject_tag" and make sure it is set to "1". By default, Amavis will fall back to the default settings (/etc/amavis/conf.d/20-debian_defaults) and add the tag "***SPAM***" to the subject line. If you want to change this, add a "$sa_spam_subject_ta" variable to the 50-user configuration with a string that you wish to use. (More info can be found here).

With a quick "sudo service amavis restart", you can now check the headers in any (newly) received emails and you should see spam flags such as :


X-Spam-Flag: NO
X-Spam-Score: 0
X-Spam-Level:
X-Spam-Status: No, score=0 tagged_above=-999 required=4
tests=[RCVD_IN_DNSWL_NONE=-0.0001] autolearn=ham

Ok, so now we have tagged spam emails, we need to move them to the junk folder automatically. Firstly, we need to set the Dovecot "sieve" file to be used. So, edit the file "/etc/dovecot/dovecot.conf" and scroll to the "# Global sieve settings." section and edit the variable "sieve_global_path" so it is as follows: "sieve_global_path = /var/vmail/sieve/dovecot.sieve". Before restarting Dovecot, we need to make sure that the sieve file exists, so CD to "/var/vmail/sieve" you will need to do this as root, so "sudo -i" first.

List everything in the directory and you should see a file named "dovecot.sieve.sample" copy it to "dovecot.sieve" (

cp dovecot.sieve.sample dovecot.sieve"
). Now, change the permissions to 0700 (
chmod 0700 dovecot.sieve
) and change the owner and group to vmail (
chown vmail:vmail dovecot.sieve
). (Have a look at the file and you will see and "if" statement that designates anything with the "X-Spam-Flag" header as "Yes", will be moved to the "Junk" folder:


if header :is "X-Spam-Flag" "YES"
{
fileinto "Junk";
stop;
}

Finally, restart dovecot and you should see any new spam emails automatically pushed to the Junk folder. Rather than waiting for a spam email to come through, you can send one to yourself (from an external server, such as gmail), with the GTUBE (Generic Test for Unsolicited Bulk Email) content, found here :


Subject: Test spam mail (GTUBE)

Content:
This is the GTUBE, the
Generic
Test for
Unsolicited
Bulk
Email

XJS*C4JDBQADN1.NSBN3*2IDNEN*GTUBE-STANDARD-ANTI-UBE-TEST-EMAIL*C.34X

So there we go, automatically move spam to your junk folder.

Selasa, 28 Mei 2013

Creating Subdomains with Apache Virtual Hosts | Apache Subdomain Virtual Host Example

Set Up Subdomains with Apache Virtual Hosts

Some people are unaware that the "www" part of the URL is actually a subdomain (http://www.example.com), and can (in theory) point to a different location than http://example.com - it is not advised that you use www as an active sudomain, as most people expect both example.com and www.example.com to have the same content.

This is actually the basis for canonicalisation, but that's another blog post altogether

So how do we set up subdomains using Apache virtual hosts? It's actually very simple, we just need to configure two things, follow this guide for a very simple apache subdomain virtual host example:

  1. Apache Virtual Host Configuration File
  2. Your DNS settings
Setting up your Apache Virtual Hosts file for subdomains is very easy. In fact, you can pretty much copy and paste my config file, just change to your domain and point "DocumentRoot" to wherever you store your site files. If you have set up a virtual host on your server already, you will recognise the layout of the following apache subdomain virtual host example.


<VirtualHost *:80>
# Admin email, Server Name (domain name) and any aliases
ServerAdmin contact@randoof.info
ServerName www.randoof.info
ServerAlias randoof.info

# Index file and Document Root (where the public files are located)
DirectoryIndex index.html index.php
DocumentRoot /srv/www/randoof.info/public_html/

# Custom log file locations
LogLevel warn
ErrorLog /srv/www/randoof.info/logs/error.log
CustomLog /srv/www/randoof.info/logs/access.log combined
</VirtualHost>

<VirtualHost *:80>
# Admin email, Server Name (domain name) and any aliases
ServerAdmin contact@randoof.info
ServerName dev.randoof.info
DocumentRoot /srv/www/randoof.info/dev/

# Custom log file locations
LogLevel warn
ErrorLog /srv/www/randoof.info/logs/dev.error.log
CustomLog /srv/www/randoof.info/logs/dev.access.log common
</VirtualHost>

Depending on how who your domain is set up with, the actual way you change your DNS settings will vary, but the underlying principle to create subdomains with Apache Virtual Hosts is simple. Create a new "A Record" with the left side ("host name") set to "dev" and the right side pointing to your server's IP address.

Don't forget to reload Apache after setting up your virtual host subdomain (sudo service apache2 reload).

That's basically it, there's not much to the apache subdomain virtual host example, probably the hardest part is the DNS configuration, but generally even that is simple.

Jumat, 25 Januari 2013

A Free and Easy Way to Host Email on Your VPS - iRedMail

Woops .. I think it's been far too long since I have last updated this blog, so apologies about that.
I thought it would be prudent to provide a simple and brilliant way to host and serve emails on your VPS. The advantage of the procedure i will be covering means it makes it easy to host websites on a VPS as well.
So, it is possible - and advised by many - to manually set up an email server, here's a quick list of one common and possible collections of applications you will need for an Ubuntu email server:


Postfix + Courier IMAP + MySQL + Amavisd-new + SpamAssassin
 + ClamAV + SASL + TLS + Roundcube + Postgrey

That will cover every aspect you require to set up your email server, including a databse for users, web-, IMAP- and POP-based mail access and antivirus. That's fine and more power to you if you can set that up manually and getting working perfectly. I honestly did go through the entire process in order to manually configure an email server but I got stuck trying to correctly configure DKIM (DomainKeys Identified Mail) and SPF (Sender Policy Framework) validation.
Here's a lovely overview, courtesy of http://workaround.org/ispmail/lenny/bigpicture - side note: Bookmark workaround.org, it's another very helpful site which is great for geeking out and Linux Tutorials

Simple huh?!
So, long story short, after much research, tearing my (virtual) hair out and many server resets, I finally came across a fantastic and free (although there is a paid version) package called iRedMail. I honestly cannot recommend this package enough. At its core, it is a script that downloads and configures a number of software packages:

Postfix, Dovecot, Apache, MySQL, OpenLDAP, Policyd, Amavisd, ClamAV,
Roundcube, Awstats and Fail2ban

You literally answer a couple of questions and the entire system is set up for you. Brilliant. Not that you need it, but for a guide to install IredMail on Ubuntu, try here.
If, by some chance, you have followed my blog up to this point, now is the perfect time to install iRedMail, as you want a basically clean VPS to install it on as it will install everything you need to host and serve multiple websites, using what is known as "Virtual Hosts" with Apache2. Setting up Virtual Hosts will feauter as my next blog entry.

Sabtu, 18 Februari 2012

ipTables Tutorial | ipTables Ubuntu *Updated*

ipTables Tutorial


ipTables is definitely confusing to begin with, but for an unmanaged VPS server it is a completely necessary part. This ipTables tutorial will not necessarily be as in-depth as some which are available, simply as I don't know as much! However, I will link to any ipTables tutorial which I have used or I think is worthy of a read.

UPDATE: Automatically update your iptables with Spamhaus Drop List of Spam IPs

Skip to it here

ipTables, Tables, Chains and Rules


There a different parts of ipTables which make up the structure, but it is only that; a structure. It isn't particularly hard to underdtand the structure, but it will make a big difference as to understanding ipTables.

Structure - you can have multiple tables, and with those tables, multiple chains, and within those chains, multiple rules.


Table:

  Chain 1

        Firewall Rule 1

        Firewall Rule 2

  Chain 2

        Firewall Rule 1

        Firewall Rule 2

        Firewall Rule 3


So, a collection firewall rules make up a chain, and a collection of chains make up a table.

There are a number of pre-configured tables when you install ipTables, and they are "Filter Table", "NAT Table", "Mangle Table", and "Raw table".

"Filter" is the default table which is used if you do not add your own table, and This is the table I will be altering.

Filter contains the following chains:


INPUT - Incoming

OUTPUT - Outgoing

FORWARD - For sending data to other computers on the same server


ipTables rules work in a similar way to conditional statements in languages such as PHP. They contain a condition which is either matched or not matched and a consequent ("target") if the condition is met. The consequent can either be rules or the execution of special values


ipTables use the structure:


[rule number] [target] [protocol] [option] [source] [destination]

The values which can be specified in "Target" are:


[Accept] The firewall let the data through
[Drop] The firewall ignore the data
[Queue] The firewall the data is made available to "userland" applications
[Return] The next set of rule in the chain are ignored, and instead, control is returned to the "calling" chain.


Before I add any rules, I first need to install ipTables using the command "sudo apt-get install iptables". For good practice, I will export the default ruleset with the command "sudo iptables-save > /home/randoof/iptables.default.rules

Next, I need to create my ruleset for the "Filter" table by first creating a file "nano /home/randoof/iptables.rules.new" and then using the following rules (which you can find here)


*filter

# Allows all loopback (lo0) traffic and drop all traffic to 127/8 that doesn't use lo0
-A INPUT -i lo -j ACCEPT
-A INPUT ! -i lo -d 127.0.0.0/8 -j REJECT

# Accepts all established inbound connections
-A INPUT -m state --state ESTABLISHED,RELATED -j ACCEPT

# Allows all outbound traffic
# You could modify this to only allow certain traffic
-A OUTPUT -j ACCEPT

# Allows HTTP and HTTPS connections from anywhere (the normal ports for websites)
-A INPUT -p tcp --dport 80 -j ACCEPT
-A INPUT -p tcp --dport 443 -j ACCEPT

# Allows SSH connections for script kiddies
# THE -dport NUMBER IS THE SAME ONE YOU SET UP IN THE SSHD_CONFIG FILE
-A INPUT -p tcp -m state --state NEW --dport 30000 -j ACCEPT

# Now you should read up on iptables rules and consider whether ssh access
# for everyone is really desired. Most likely you will only allow access from certain IPs.

# Allow ping
-A INPUT -p icmp -m icmp --icmp-type 8 -j ACCEPT

# log iptables denied calls (access via 'dmesg' command)
-A INPUT -m limit --limit 5/min -j LOG --log-prefix "iptables denied: " --log-level 7

# Reject all other inbound - default deny unless explicitly allowed policy:
-A INPUT -j REJECT
-A FORWARD -j REJECT

COMMIT


Once I have saved the file, I then need to import it into iptables with the command "sudo iptables-restore < iptables.new.rules"

The next thing I need to do is ensure that my ruleset is restored to iptables at every system reboot. I can do this by editing the "rc.local" file located in the "etc" directory, which executes any listed commands when the system reboots. So "sudo nano /etc/rc.local". Currently, my rc.local file has no commands, so I just need to add the iptables-restore command so it will be run automatically.

The iptables binaries are stored in the /sbin directory, so it's important to include that in the restore command, so: "/sbin/iptables-restore < /home/randoof/iptables.new.rules".

Make sure to change the port number to the one you configured in the "sshd_config" file.


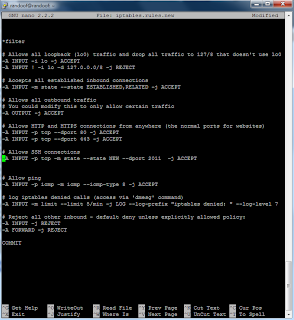
Once that is complete, all I need to do is reboot restart ssh with the command "/etc/init.d/ssh restart" and then I will reboot the system - "reboot" - and log back in, then check my ipTables configurations have been loaded using the command "sudo iptables -L", which then lists all of my tables, chains and rules.

Automatically add Spamhaus Drop List to IPtables
Whether you have read the iptables tutorial above or not, one of the most helpful things it to be able to block ips with iptables. You can do this manually by updating your iptables rules file with the following line:

-A INPUT -s 123.456.1.18 -j DROP

All you need to do is input the ip address you wish to block instead of 123.456.1.18

That's all well and good, but what if, rather than reactive, you wish to be proactive and block ips with iptables automatically? Then you need to to automatically add Spamhaus drop list to iptables. That is possible with a little scripting. Below is a file which I have modified slightly in order for me to be able to automatically add Spamhaus drop list to iptables using cron

Let's check our current IPtables rules:
sudo iptables -L

Firstly, create a bash script

nano iptables_update.sh

and paste the following code:


#download the latest spamhaus ip drop list 

wget http://www.spamhaus.org/drop/drop.lasso -O drop.lasso

if [ -n "$1" ]; then
DropList="$1"
else
DropList="./drop.lasso"
fi

cat "$DropList" \
| sed -e 's/;.*//' \
| grep -v '^ *$' \
| while read OneNetBlock ; do
/sbin/iptables -I INPUT -s "$OneNetBlock" -j DROP
/sbin/iptables -I OUTPUT -d "$OneNetBlock" -j DROP
/sbin/iptables -I FORWARD -s "$OneNetBlock" -j DROP
/sbin/iptables -I FORWARD -d "$OneNetBlock" -j DROP
done

Basically, this downloads the latest Spamhaus ip Droplist, and steps through the list, creating the rules for each ip address, automatically adding the ip address to the iptables filter.
Please note in order to automatically add the Spamhaus ip drop list to iptables, you first require wget to be installed (sudo apt-get install wget).

Now, if we check
sudo iptables -L
  

it will now list all of the Spamhaus ip drop list (albeit probably quite slowly, in which case you can cancel with CTRL+C)

Spamhaus requests that you do not download the drop list more than once an hour, and advises just once a day, which is what I do. I run the bash script automactically during a quiet time for my server using Crontab:
 
sudo crontab -e
 
and then adding the line:
 
#automatically add Spamhaus drop list to iptables at 3.45am
45   3   *   *   *   /bin/bash /home/randoof/iptables_update.sh
 
This line will run the bash script as sudo (required to update iptables) at 3.45am every morning.

That's it for another entry, please remember to click an advert if I have helped you :)

As promised, here are some helpful links which I used as reference for what has definitey been the most complicated step in my unmanaged VPS ipTables Tutorial:


Ubuntu Forums
The Geek Stuff ipTables introduction - Extremely helpful.
Debian Wiki ipTables ruleset basic configuration

Kamis, 16 Februari 2012

Ubuntu Change Hostname | Linux Change Hostname | Ubuntu Server Tips

Ubuntu Change Hostname

Not a necessity, but probably worth doing is the Ubuntu change hostname command. By default, an Ubuntu server will have a hostname which has probably been set by your unmanaged server host.


In my case, the hostname is a unique string of numbers. Whilst a unique name is good practice, it is not particularly helpful. For this reason, I am going to change my hostname to something more memorable. The main reason for an Ubuntu change hostname command is so that when you are using SSH, something more recognisable is displayed, so if you have a whole host of servers, you can quickly and easily make sure you are using the correct one.
In order to be safe I will first make a backup of the file responsible for the hostname ("hostname" oddly enough), as I am prone to typos. This makes the process a bit longer, but it also a good opportunity to try some different commands and that's always fun.
So the first command is to copy (cp ) the hostname file which is located in the etc directory so "sudo cp /etc/hostname /etc/hostname.old".
Then I can edit the hostname file to name my hostname to something more helpful. "sudo nano /etc/hostname"
I also need to change the "hosts" file, which follows the same steps: "sudo cp /etc/hosts /etc/hosts.old" and then "sudo nano /etc/hosts".
This hosts file however has a bit more structure to it, and is as follows:

127.0.0.1 localhost.localdomain localhost
12.34.56.78 hostname.domain.com hostname

So for my server, that will become:

127.0.0.1 localhost.localdomain localhost
12.34.56.78 randoof.domain.com randoof

All that's left is to reboot "sudo reboot".